Best warm up exercises

Working out safely means warming up, and we don’t mean standing there holding your leg like you did in Year 8 P.E. A powerful and dynamic warm-up routine is essential for getting the most out of your body and minimising the risk of injury – especially when you’re lifting heavy or moving explosively.
What are the benefits of warming up?
Preparing your body for anything strenuous makes it less likely you’ll hurt yourself. Hurting yourself can take you out of action for weeks or months – and that’s best avoided.
Beyond mitigating injury risk, warming up also:
Makes you more flexible, and reduces tension.
Increases your blood flow.
Increases oxygen levels in your muscles.
Increases your range of motion.
The best warm up exercises
There are virtually limitless variations to these warmup exercises, but the ones below are a great place to start. Some are quite intense at first, but you’ll get used to them in no time.

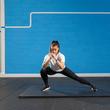
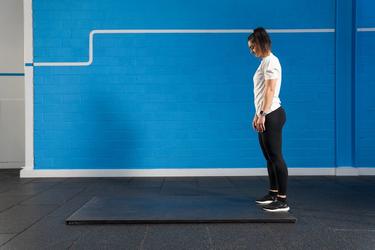
Bodyweight squats
Stand up straight, with your feet shoulder-width apart and your hands in front of you in a comfortable position. Toes should be pointing slightly outwards. Look forward, keeping your posture neutral.
Squat down as if you were going to sit in a chair. Bend at the knees and the hips at the same time keeping the chest up. Allow the knees to track over the toes.
Hold position once your thighs are parallel to the ground. Hold the position for three to five seconds and try to maintain your balance.
Gently stand up straight, putting your weight on your heels and reversing the squatting motion.
And repeat! Reps – 10, Sets – 3
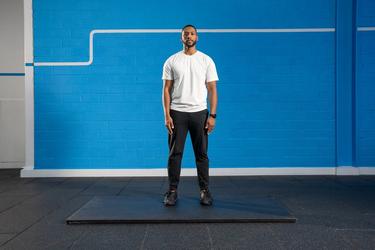
Mountain climbers
Start off in a plank position, making sure your weight is evenly distributed between your hands and your toes. Your hands should be about shoulder-width apart, and your back should be flat with an aligned head to create a straight line all the way from your tip to your toes.
Focus on activating your abs, keeping them tight throughout the exercise to really work your core.
Bring your right knee up to your chest as far as you can, gently touching your toes to the floor. Make sure you keep your left leg extended behind you.
Return your right leg to your starting position and ready to repeat the move with your left.
Bring your left knee up to your chest as far as you can, just as you did with your right, and gently touch your toes to the floor. Again, remember to keep your right leg properly extended behind you.
Continue alternating the movement between your left and right legs, aiming to do this quick, with fluid movements.
And repeat! Reps – 10, Sets – 3
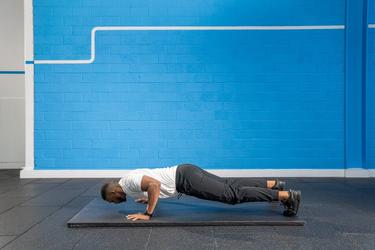
Planks
Start off by getting into a press up position, extending your arms in a straight line beneath your shoulders and raising up onto your toes.
Slowly bend your arms to lower yourself down, resting your forearms on the floor beneath your shoulders.
Keep your back straight, creating a straight line all the way from your head to your feet and looking at the space between your hands to create a neutral spine.
Activate your abs and keep them tight.
Hold the position for as long as you can, before gently lowering yourself down to the floor.
Repeat! You’ve just completed a perfect plank.
Hold for 30 seconds, then rest. Repeat if desired.
Seated piriformis stretch
Sit on a bench, or a chair, with your feet flat on the floor. Take your left ankle and put it on your right thigh just above the knee
Straighten your back and sit up straight, then push down lightly on your left knee with your left arm.
Lean forward, rounding your back if you need to (a neutral spine isn’t needed here). For extra leverage and a deeper stretch, grab your planted leg and pull yourself into the stretch.
Hold the stretch, or lean back further into it. This will create an even deeper stretch.
Hold for 30 seconds, then swap legs.
Repeat until you feel an acceptable level of tension in your piriformis (the muscle deep in your buttock, behind the gluteus maximus).
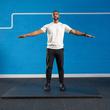
Arm circles
Stand up straight, with your feet shoulder-width apart and your hands out and parallel to the floor.
Make small circles using your whole arm, being sure to keep your back straight.
Start making larger circles with your arm, keeping your movement controlled. As the circles get bigger, you should start feeling something in your triceps (the back of your upper arm).
Continue for 10-15 seconds, before reversing the direction.
Want to learn more?
Want to get more from your workout? Our personal trainers can help you meet your goals. If you want to find out more, get in touch one of our friendly members of staff at your local Gym. They’re more than happy to give advice and help you craft a personalised fitness plan to meet your unique goals.